Quick Tip: Using Wall Plugs (Rawlplugs) in a Plastered Wall

Wall plugs need brick, block or concrete to hold well.
Plaster just will not do, because it has minimal holding power.
It’s usually way too soft you see. Sure, if the wall is plastered with hard cement render and thin skimming coats, you might get away with some light to medium loads, but generally the plastic plug needs to be pushed into the wall itself so it’s entire length is into a brick, a block or concrete etc.
Why? Because the way a wall plug works and holds in place is by expanding in a radially outwards fashion. Simply put, when you put a screw into a plastic wall plug (or an old fashioned wooden plug for that matter) it acts as a wedge, pushing the two halves of the plug apart and filling the hole very tightly. Friction then takes care of holding everything in place for all eternity; handy stuff friction… and it’s free!
Most wall plugs are only 1 1/4" to 1 1/2" (32 to 38mm) long and most plaster on walls is between 1/2 (12.5mm) to 3/4 (19mm) or so thick. So, doing the maths and taking the thickness of the plaster away from the length of the plug you’ll figure out that not much of the plug is actually going into the brick/block/concrete if you leave them flush with the plaster. Also, the front part of the brick is not able to take much load either without risking a ‘fisheye’ breakout under load.
Wall plugs work best when their WHOLE LENGTH is fully inside the walls main building material, thus relieving the plaster and the front face of the walling material from stress.
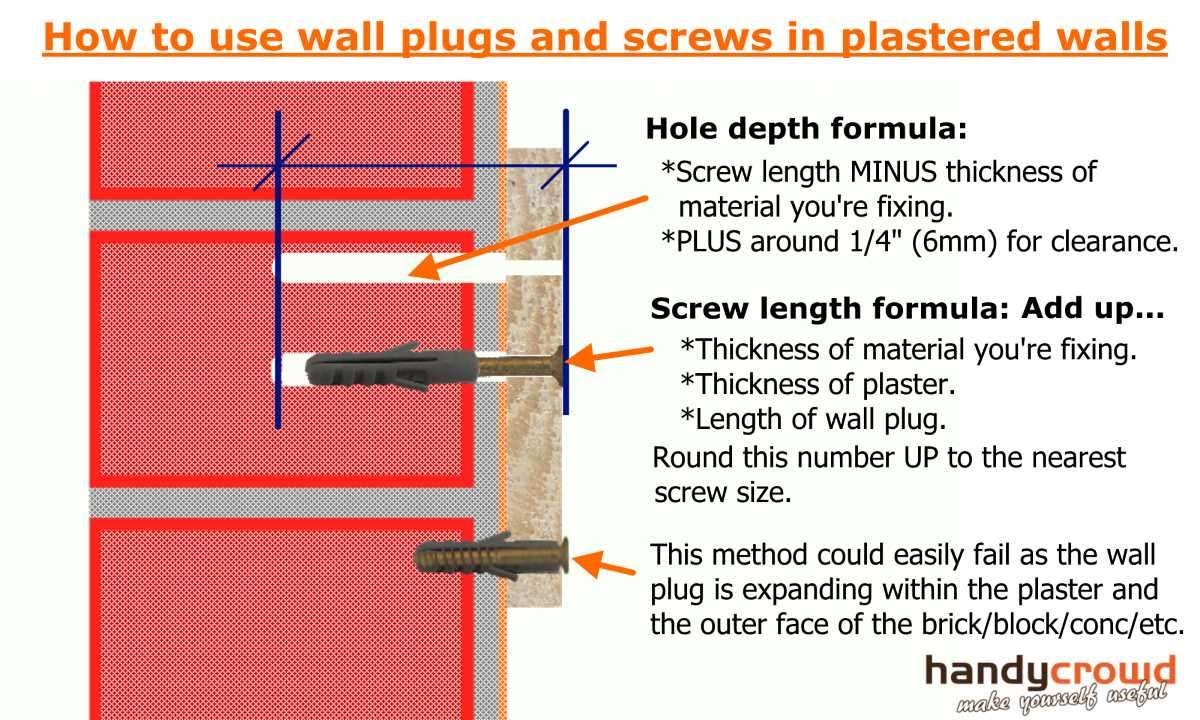
Quick ’n’ dirty sketch of ‘textbook’ installation of Rawlplugs….
How to put screws into plastic wall plugs (rawlplugs) on a plastered wall.
How to install plastic wall plugs
- Mark out all your holes using a spirit level and/or tape measure.
- Carefully drill your holes, starting off slowly (possibly with the hammer action off) until the drill bit forms a shallow hole (see pic above for depth), speed up and hammer back on to finish the hole.
- Vacuum out the hole if you want to be really proper, mostly not necessary or done however….
- Push or tap your rawlplugs into your holes, flush with the plaster.
- Position the item to be fixed over the hole and put the screw through it and into the plug, twisting the screw a tiny bit by hand till it bites.
- Sometimes the above step is easier if you push the screw all the way through the item and then you’ll easily get the pointy end of the screw into the plug, sliding the item down the screw until it meets the wall.
- Using a small hammer tap the screw to push the plug through the plaster and into the wall itself and stop when the length of screw sticking out equals the length of the wall plug.
- Tighten up the screw, being careful not to push for the first few turns or you might push the plug in deeper (not good).
- Working this way ensures the plug is exactly the right depth into the wall and the screw will go all the way to the end of the wall plug when pulled up tight.
- Perfect. Rinse and repeat with the other screws.
- Put the kettle on or head to the fridge depending on the time of day….
If you want to learn more about screws and plugs check out this post: Screws Explained…
Hope that helps you figure out how to use plastic wall plugs and screws on plastered walls….
Let me know if you still have any questions.
Stay well
Ian
Originally published at handycrowd.com.